Analog is resurgent, what with newbies discovering turntables and seasoned audiophiles revisiting reissued vinyl from their ill-spent youth. Digital music is a much more convenient background for other activities, but playing records better rewards attention with involvement; bitsy will just never replace groovy in the listener's lexicon. Blame the pandemic: one can read similar stories of renewed interest in other solitary but hands-on hobbies: knitting, gardening, woodworking, etc.
Part of the "hands-on" appeal of analog must surely be the multiple options to modify, personalize, or upgrade good old 20th century music reproduction mechanics. In the vernacular: tweaking. By comparison, high-tech streaming digital can be like falling asleep in a self-driving Tesla. The recent Mobile Fidelity kerfuffle has apparently freed up countless circa $50+ analog purchases, so I've compiled a compendium of affordable enhancements below that price point. Some might help the newly converted while others are perhaps more for the vinyl veteran. Several come from the world outside the audio community, some are free, some just drawn from my experiences over the years. I will add links, but keep in mind there are often multiple retail sources, prices may vary, URLs change (especially on eBay and Amazon, so search for the product), and knockoffs and even counterfeits exist there too. With that proviso, I will adopt a narrative based on analog playback in the search for better sound on the cheap. And do keep in mind that Christmas is coming, and relatives will be clueless.
So let's begin, and just mount and align a cartridge. If setting up your new megabuck cartridge gives you night sweats, let me suggest practicing with something like the $39 moving magnet Audio-Technica AT-VM95C . Yes, I'm serious. It may fall short at the frequency extremes, but it may just surprise you too. It also has a user-replaceable conical stylus, should you screw up ($25). But wait! It's also instantly upgradable from conical to elliptical ($49 or $99 for a nude shank stylus) to micro-line ($149) to Shibata ($179) stylus profiles. (There's also even one for 78s, which why I know about the AT-VM95C-I have both styli for the 3-speed Dual CS 5000 in my workroom for when I get the urge to spin some shellac). Best choice ever for teenager use, drunken orgies, or befuddling audiobuds bragging on their exotic MCs. My Lyra Kleos is better, yes, but not…100x better. And if the cleaning lady takes out your Koetsu, you will still have music. Speaking from experience here.
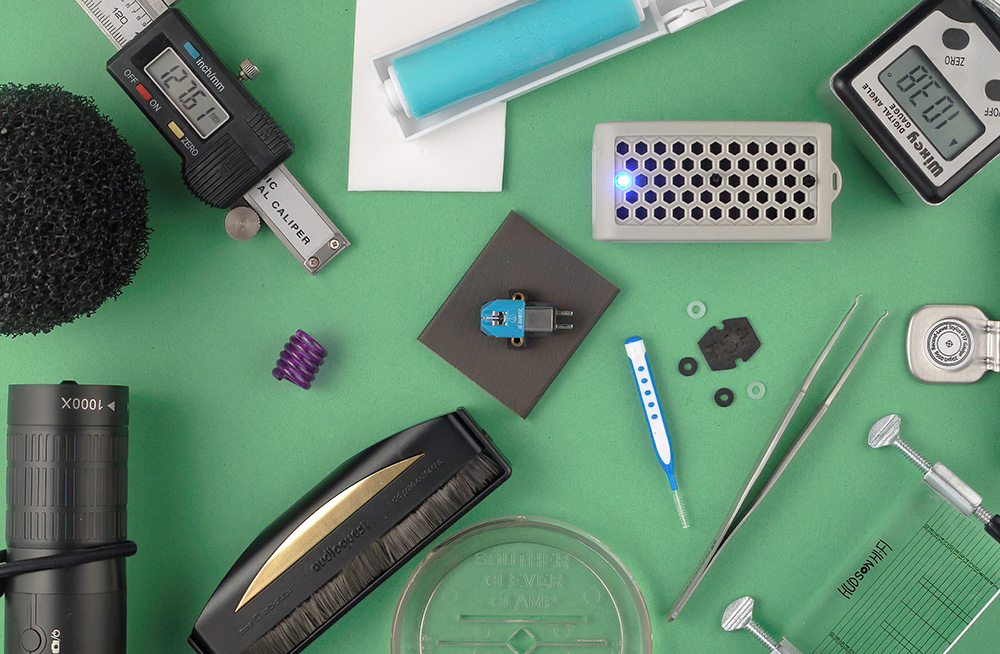
The Soundsmith EZ-Mount cartridge bolts ($40) are essential for fumble fingers types (and big enough to find when dropped on the carpet!), and the $30 Nasotech tweezers are similarly ideal for attaching the cartridge clips. Cartridge alignment usually requires immobilizing the turntable platter. Yes, you can use masking tape, but I prefer the little foam wedge "Door Corner Seals" from the weather stripping aisle. If one is too skinny, you can stick a couple together. Most audiophiles use a contact cleaner like Caig DeOxit on RCA plugs, etc., but you will need a special tool to treat the cartridge clips and miniature DIN pin sockets—one of those little flossing brushes from the drug store (or free from your dentist).
Ever notice the "needle chatter" audible when you mute the volume with a record playing? The stylus banging around the grooves generates these non-electrical micro-vibrations/resonances, which are then transmitted down the tonearm and reflected back from the pivot to the stylus, smearing the reproduction of fine detail. Since both headshells and cartridge bodies come in different materials, the interaction is unpredictable. There are a couple up-market devices out there to damp this vibration (I have an AudioMachina V8 on the Kleos), but of interest here is the Origin Live Cartridge Enabler. It is apparently a wee bit of the polymorphous material Origin Live employs in their upscale platter mat, plus screws and washers to de-couple the cartridge from the headshell. Pro tip: I used a bobby pin to hold it in place against the headshell while I fitted the bolts.
The effect in my system is obvious—increased clarity without loss of other analog(ue) virtues, and a no-brainer upgrade for most any tonearm. Origin Live has only a few dealers in North America, but they will also mail one anywhere, still under $50 given the Brexit decline of the Pound. I look forward to trying it in concert with Origin Live's platter mat and record weight—I sure know a gateway drug when I hear one.
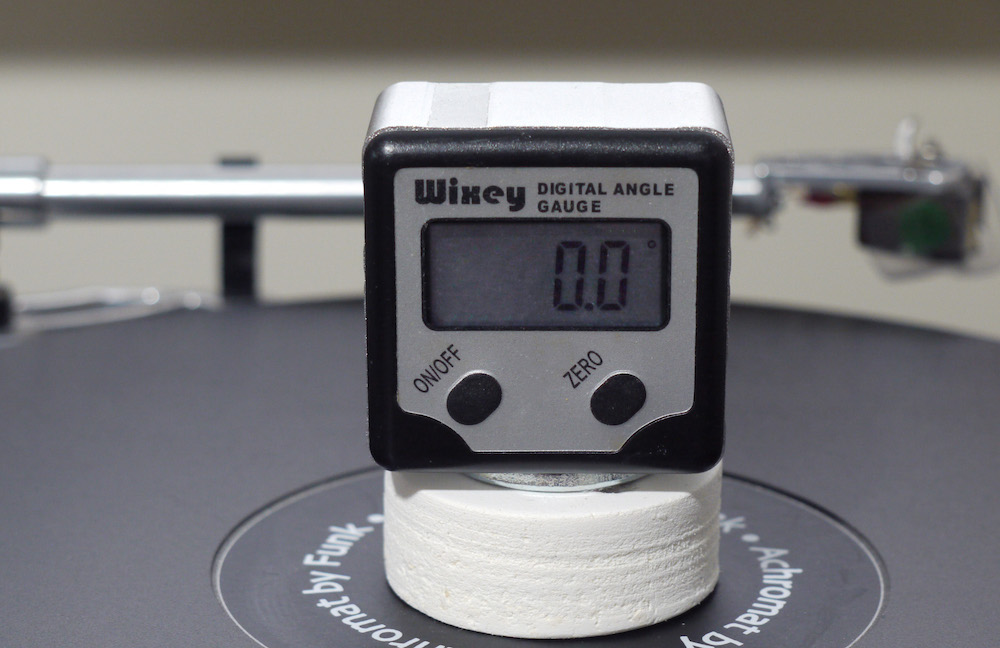
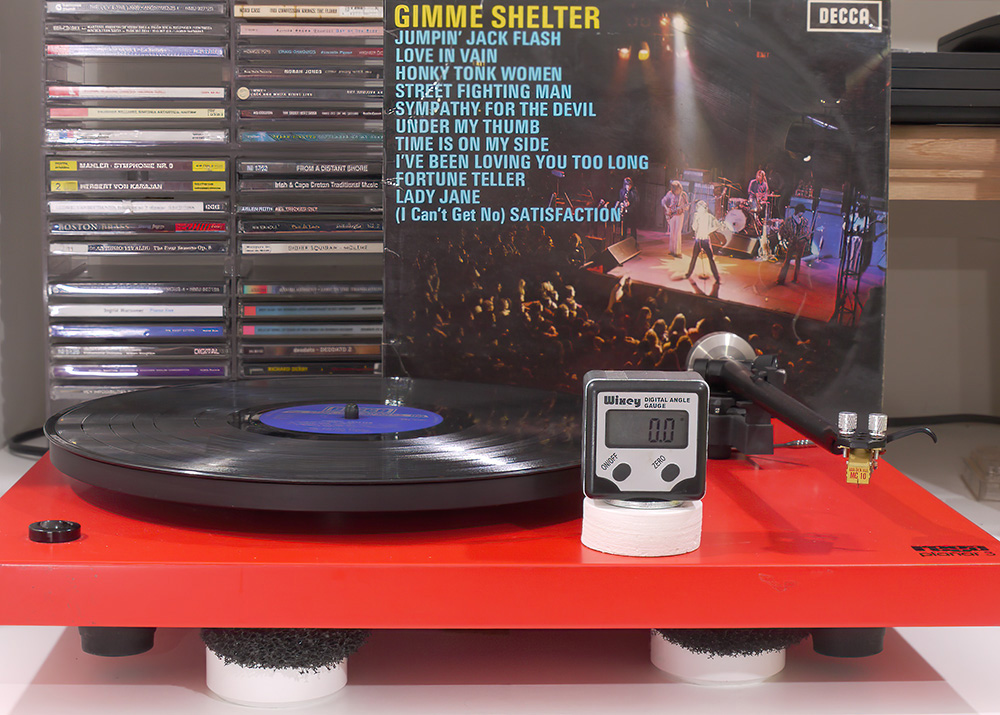
You should also level the turntable before aligning the cartridge—most decks today have adjustable feet. Yes, you can manage with just a carpenter's level, but Clearaudio sells a nice little $25 dedicated bubble level that sits over the spindle. The triangle pattern simplifies the task for turntables with three feet (like my Rega and Spacedeck), but is less ideal for ones with four feet; there are knock-off options with four reference points from Amazon/eBay, but not all sit atop the spindle. Sure, we all understand bubble levels are purist analog devices, but my heretical hack from years back was to cut a disc of scrap Azak lightweight faux wood with a hole saw, ream out the center hole a bit (to 5/16ths) to suit the spindle, glue a steel fender washer on it, and mount a magnetic mini digital level on top.
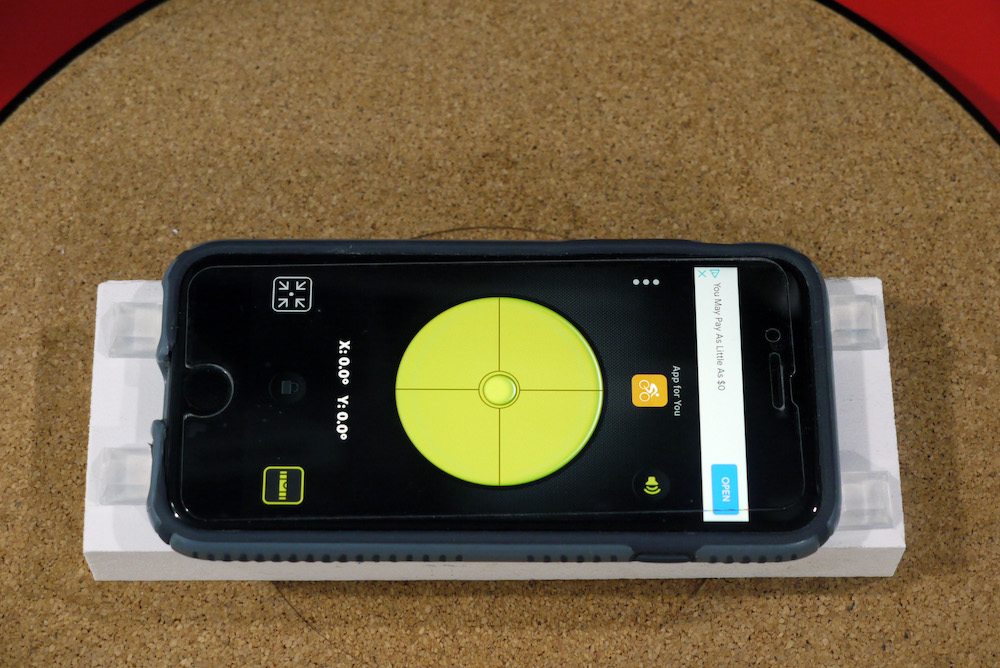
Happy I was for years until I discovered there's an app for that, the result being center-drilling an iPhone size slab of Azak. Yes I know there are also apps for measuring speed accuracy and other audio tasks, stuff maybe for another article…but this is so cool:
Many turntables and arms come with paper alignment protractors, and while there are many eBay/Amazon options for more durable inexpensive "universal" ones, eBay also currently has vendors offering precise tonearm-specific protractors from Greece, Scotland, and Ukraine, all under-budget. The latter source, Legendary Audio, offers hundreds of custom units for anything from a Dual 1019 to the likes of Graham, Kuzma, and Reed high-end arms, complete with info on alternate Baerwald/Lofgren/Stevenson alignments and more. Yes, eBay notes delivery from a war zone may be delayed, but you are probably used to that from the recent USPS service decline anyway. Perfect way to assuage any guilt over buying tubes from the Russkies.
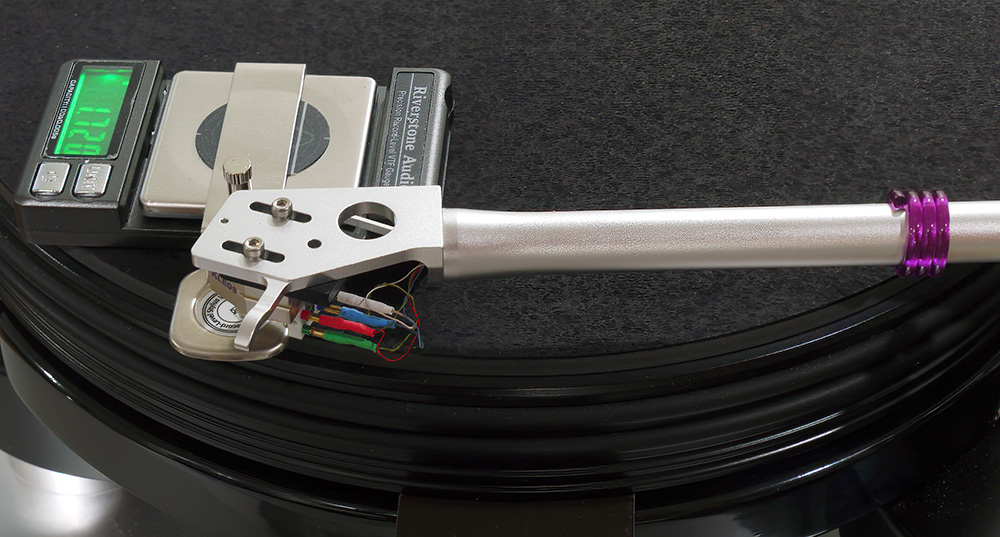
For setting Vertical Tracking Force accurately I do suggest a "3 digit" scale such as the Riverstone ($32.50). Adjusting precise VTF by shifting a heavy counterweight by fractions of a millimeter is a pain, especially if it requires locking a setscrew. Perhaps a knitter in your family can direct you to a yarn shop where you can find Clover Coil Knitting Needle Holders, lightweight plastic coils that wrap nicely around a tonearm. Install one near the armrest, and set the VTF "close but low." Sliding it to-and-fro makes tiny changes in VTF a snap (and damping tonearm vibration a bit is a nice bonus). If you have a tone arm with "hanging weight" anti-skate, pick up a crochet needle as well; the perfect tool for maneuvering the mono-filament and cartridge leads.
Like most Lyra cartridges, my Kleos is damn tetchy about VTF (1.65-1.75g, but 1.72 is "preferred"). That's a breeze with the Clover coils. They are a bit "grippy," so a small screwdriver helps "caterpillar" the coils along one curl at a time. They only weigh about 1.25g, but their influence increases as you move them away from the pivot. After all, you are setting VTF the way Archimedes intended.
Of course, changing VTF also changes Vertical Tracking Angle (and Stylus Rake Angle)…so if you want to explore Michael Fremer's digital microscope system for SRA adjustments, there are lots of options on Amazon. Search for the $44 Cainda digital microscope. Why this one? Primarily because it incorporates a rack-and-pinion microscope-style stand, rather than the more common "double knuckle" mount, which makes it easy to hack for horizontal use (I used Scunci ponytail bands) and thus allow precise height alignment with the stylus. I don't know if Michael still recommends setting the stylus on the edge of a CD, but I prefer a piece of 2mm non-glare acrylic from a frame shop (which reduces stylus "skitter"). I use a Mac with the Photo Booth app, then open the image in Photoshop and use the "Ruler" tool to level the acrylic base before using it to get the precise angle of the stylus.
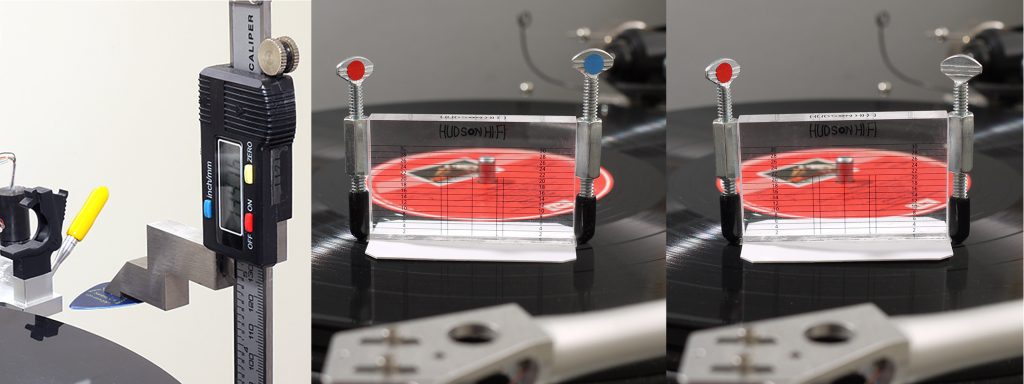
Back when I had room for a woodshop, I bought a digital height gauge to set router and saw blades. Turns out it is also great to measure tonearm height and reset VTA—look closely and you can see I stuck a guitar pick on it as a precise pointer. There are now many similar knockoffs on Amazon. But for setting VTA by ear or maintaining consistent VTA with different platter mats or pressing thickness, I use the Hudson HiFi gizmo ($14.50) that features a series of parallel lines., (there are knock-offs of this too). Using it to eyeball the headshell level from the side and front may get you close to the optimum VTA and azimuth, but your ear (and cartridge) may well prefer a bit of tilt. My hack is to make the Hudson a variable guide. I superglued 10-32 thread couplers to the sides, and wing bolts to allow adjustment. I added thread caps to protect the disc, and a scrap piece of plastic as a base. To use, just elevate one side until the gridlines are parallel to the arm or headshell as needed—each rotation tilts the "ruler" 1/32", and half and quarter turns are easy to effect. Count and record the number of turns from level for each cartridge/headshell combo adjust VTA to suit.
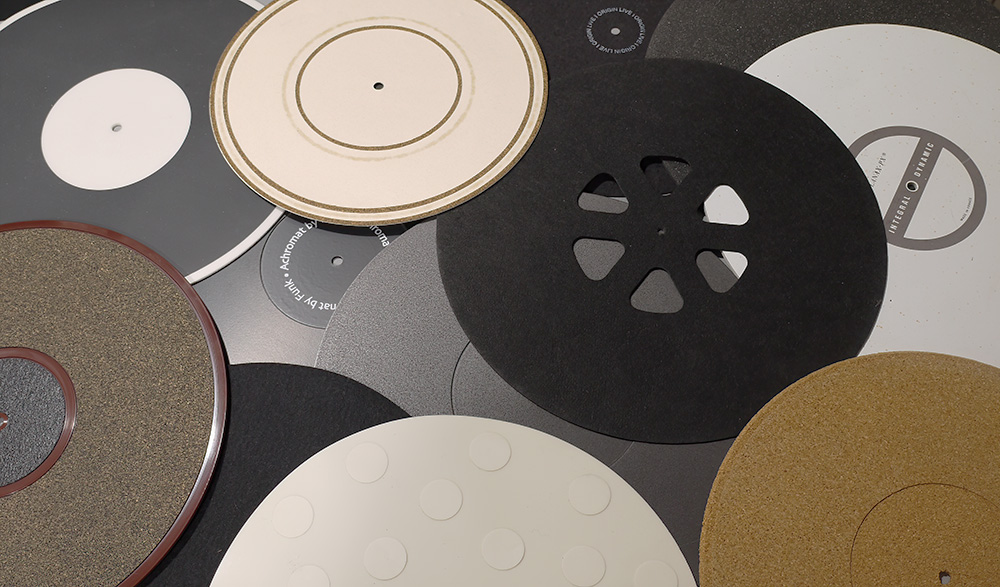
Okay, so I'm a serial platter mat addict, but materially agnostic. Hard, soft, felt, metal, or mystery mat, any given mat can sound different whether the platter is metal, acrylic, glass, or ceramic. You might try a couple of inexpensive ones—Amazon and eBay have plenty made of various materials, and don't discount layering two (but reset the VTA!).
Keep in mind any mat's effectiveness depends on contact with the vinyl. Some platter mats have a central recess for the "label." That's because a modern LP pressing is thinner across the grooved area than in the label area or at the outer lip. (This contour is a legacy of the "automatic changers" designed to drop 78 rpm discs in sequence; recessing the grooves helped prevent damage to the vinyl on those machines). Yes, that means the LP is often not in contact with a mat except at the label and rim. Few mats are contoured to improve groove area contact other than by having an outer diameter a bit smaller than an LP. The popular Herbie's Way Excellent II has two layers to address this, but is over our budget ($65 and up). However, also on the website is their thin 11" diameter Donut Mat + washer ($33.19) which appears to be the top layer of the Way Ex II, and which you can add atop any other mat. (By the way, I "store" mine on my VPI RCM, where it nicely prevents fluid leakage onto the cork platter).
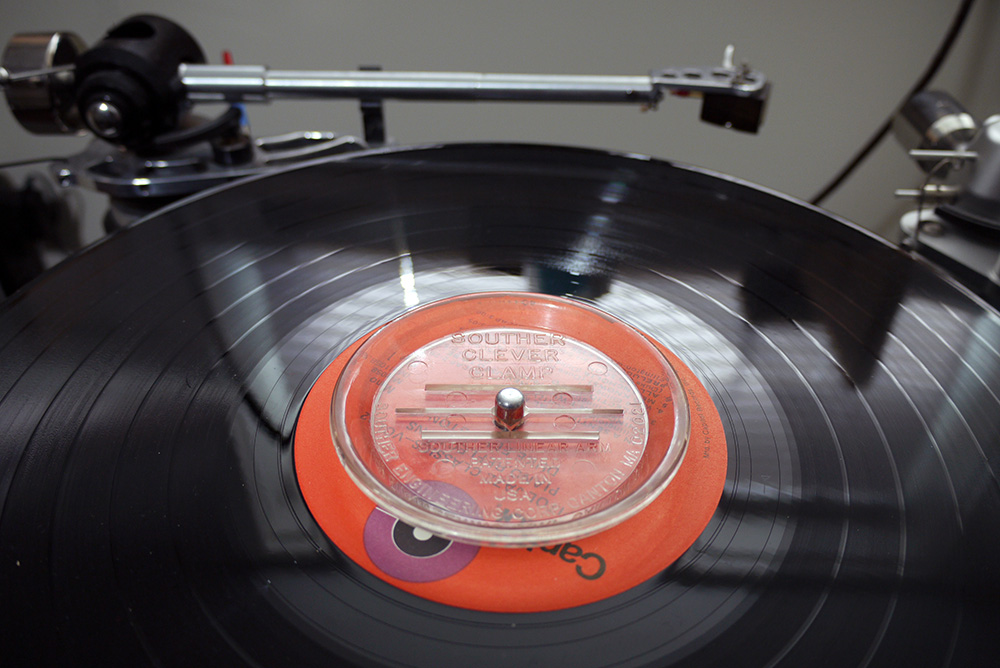
Mating a mat with the right record weight or clamp is the next level of difficulty. After you've messed up drilling out that hockey puck, consider the scores of weights and clamps available from the usual suspects. A weight too heavy can stress a budget deck's bearing or compromise a spring suspension or other isolation technology. If a turntable comes with a bespoke clamp or weight one assumes the manufacturer takes that into consideration. My baseline "do no harm" recommendation is the featherweight $40 Clearaudio Clever Clamp—I've had mine since before they bought out inventor Lou Souther (they really wanted his linear tracking tonearm). If you have lots of dish-warped discs, a screw-down clamp like the $35 Record Doctor or similar Amazon/eBay knockoff is in order (all inspired by the classic J Michell clamp). The pro trick is to slip a neoprene (i.e. non-scratching) washer over the spindle under the LP, so screwing down the clamp tries to force the outer LP lip into submission. Occasionally, a mismatched clamp/weight/mat/platter combo will actually lift the lip off the mat; an appropriate washer again may also fix that.
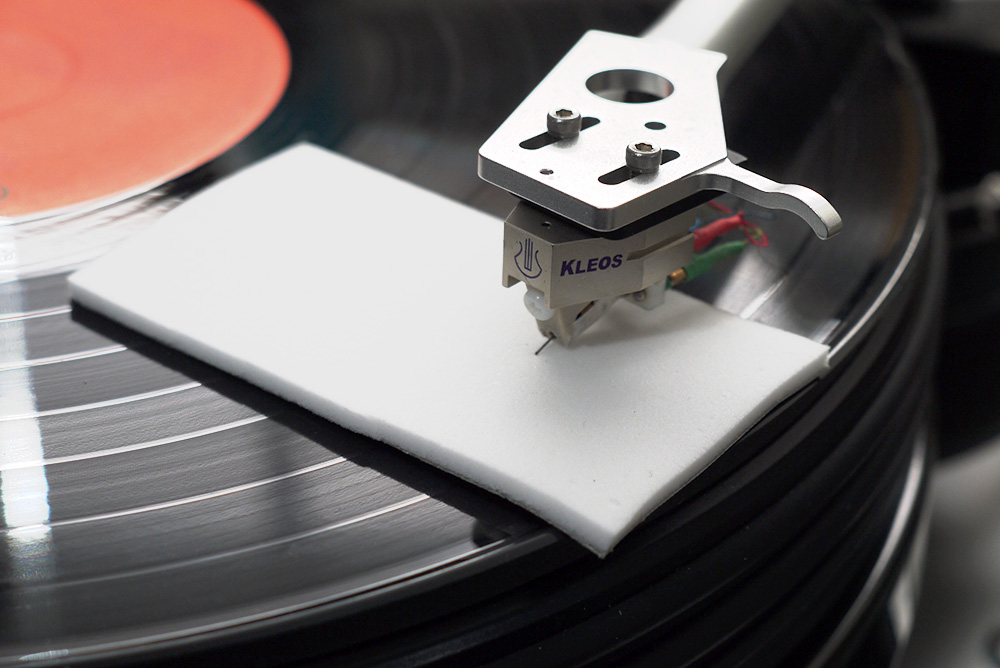
Now to clean that stylus! Yes, there are many potions and goops sold for the purpose, some for serious coin per ounce. All (should) come with a warning that misuse can have adverse and expensive consequences—weakening the stylus/cantilever bond, fluid wicking up into the "works," etc. Same disclaimer here, but I know I'm hardly the only audiophile to have sliced off a sliver of Magic Eraser foam and stuck it on a toothpick to take advantage of it's micro-abrasive nature to clean a stylus. But technology moves on, and you no longer have to worry about slicing off a fingertip as well. Introducing the Mr. Clean Magic Eraser Sheet, a pack of 8, $3.50 at my local grocer, or under $ .50 per sheet. My hack is to stick one side to duct tape and trim the excess to eliminate any possibility of shedding dust. After every play, place on the LP or platter, and lower/raise the stylus a few times.
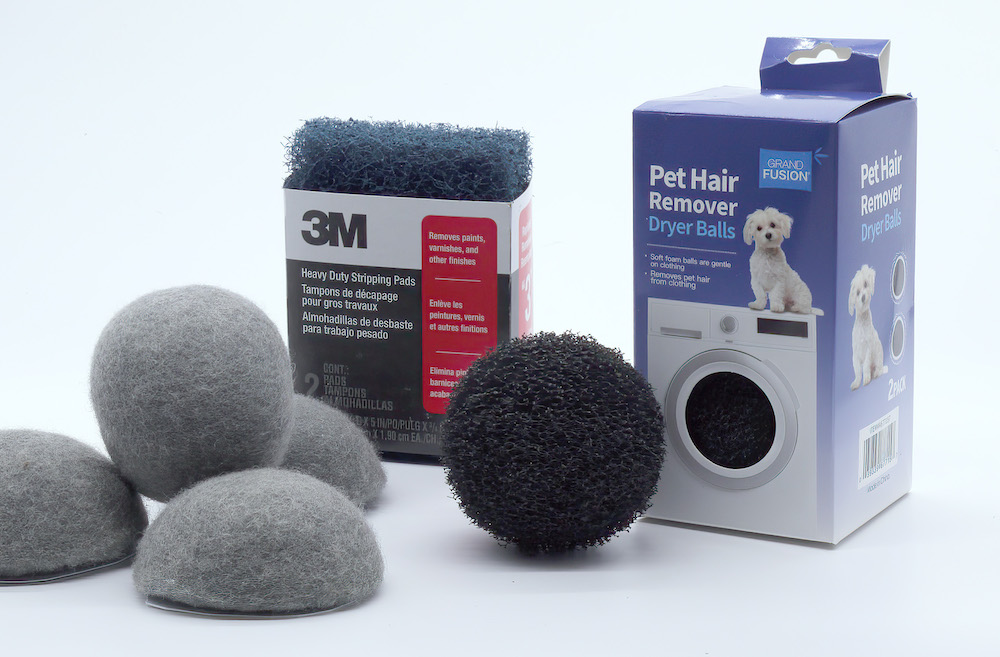
Back in the golden age of Shaded Dogs and Deep Grooves, many of the better players (AR, Thorens, Ariston, Linn, SOTA, etc) were spring-suspended sub-chassis designs. This provided acoustic isolation from footfalls, bass modes, and other vibrations. Most turntables today rely on rubbery feet—mostly because suspended designs are more complicated and expensive. My esteemed PF colleague John Zurek recently enthused HERE over the wool balls now offered by Gingko Audio for their isolation platforms. I've also always had positive result with Gingko's products, but I'm hardly the only clean-living audio geek to notice their balls' similarity to the somewhat larger woolen balls I use in the clothes dryer. Gingko charges more, but the generic laundry versions do vary a lot in size, shape, and density. But seriously, John, when you really must have the best—along with import or upscale exotic bragging rights—my local vendor has them from New Zealand or made from luxe alpaca wool. And in colors.
Which brings me to my own independent research. Given the constraints of my small space and rack, isolating the little boxes and linear power supplies in my streaming setup presented a problem, as did stacking larger components—the commercial footers I had were too tall. I've been exploring what I would describe as hardware store-grade, low profile, multiple indirect path vibration absorption materials. Essentially, the functional opposite of the familiar audio spike. 3M cross-linked fiber stripping pads, bubble wrap between thin plastic sheets as constrained layer damping, or felt carpet underlayment under glass, for example. I realized that felted wool dryer balls could solve the component stacking problem, but their 3" diameter/height was excessive for my needs. I cut some down with a sharp bread knife in a bagel slicer, and used some Elmer's craft glue to stick them on thin plastic sheets, trimmed to fit. Then I happened to discover in my local grocery's detergent aisle the pet hair dryer ball variant, also available online HERE ($15 for 6). They are entirely different than the dense woolies, being a very open plastic cross-linked matrix, weight about 5g, and rather squishable. They worked nicely (6 balls below, 4 between) with my stacked Herron (tube) and Sutherland (current-mode) phono stages. More intriguingly, their hysteresis behavior, or speed of return after deformation, resembled a well-damped spring, as used in those old-school turntables. Hmmm.
The original Rega Planar 3 in my office sits on a resonant countertop, supported by its three wobbly feet—I don't know about the current version. Most of the weight is to the rear (motor and tonearm) so I needed to be able to slide the balls around asymmetrically to level the deck. I set four balls in 2" PVC pipe couplers ($1.69), which also raised the stock feet above the counter. I then could fine-tune the level with a 5th ball under the middle of the plinth. And lo! I got a controlled bounce to warm the heart of any Linn setup guy. Sonically, the "suspended" Rega sounds smoother and sweeter too. If you have any "platter-on-a-plank" turntable this might be worth trying, but your mileage may vary of course—the number of balls needed is location and load-dependent.
Before we play a disc, we should deal with the twin banes of analog: dust and its partner in crime, static electricity. I still buy LPs at yard sales and thrift stores, so I've long used lint rollers to remove debris on discs before cleaning them on my VPI vacuum record cleaner. Sticky tape rollers work fine, but I prefer the high tech silicone versions. I recently bought this ($12) combo on Amazon. Both are very sticky, the big one works better on an LP, but the little folding model is just the thing for cleaning the Disc Doctor velvet brush and the fabric strips on my VPI vacuum record cleaner wand (and it's eminently pocketable for foraging at Goodwill). Maybe more tips on record cleaning another time, though.
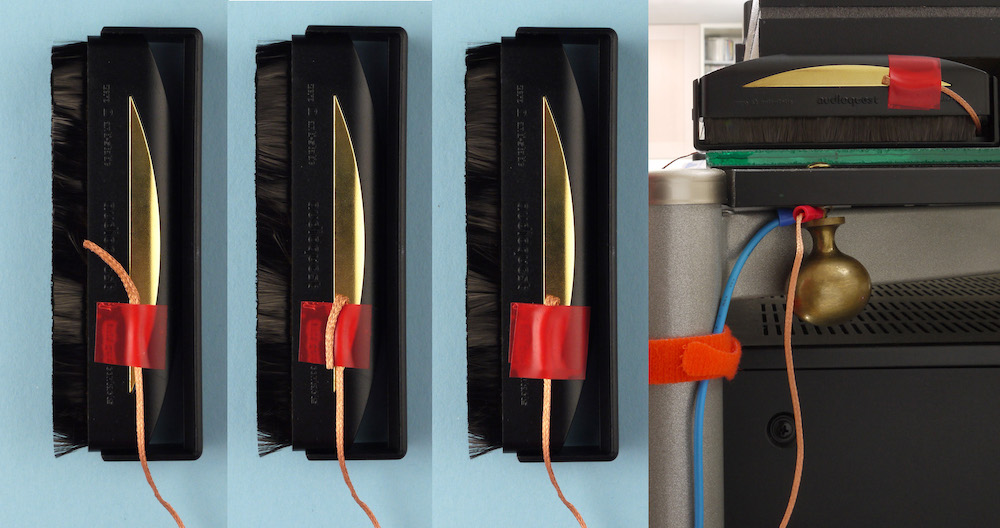
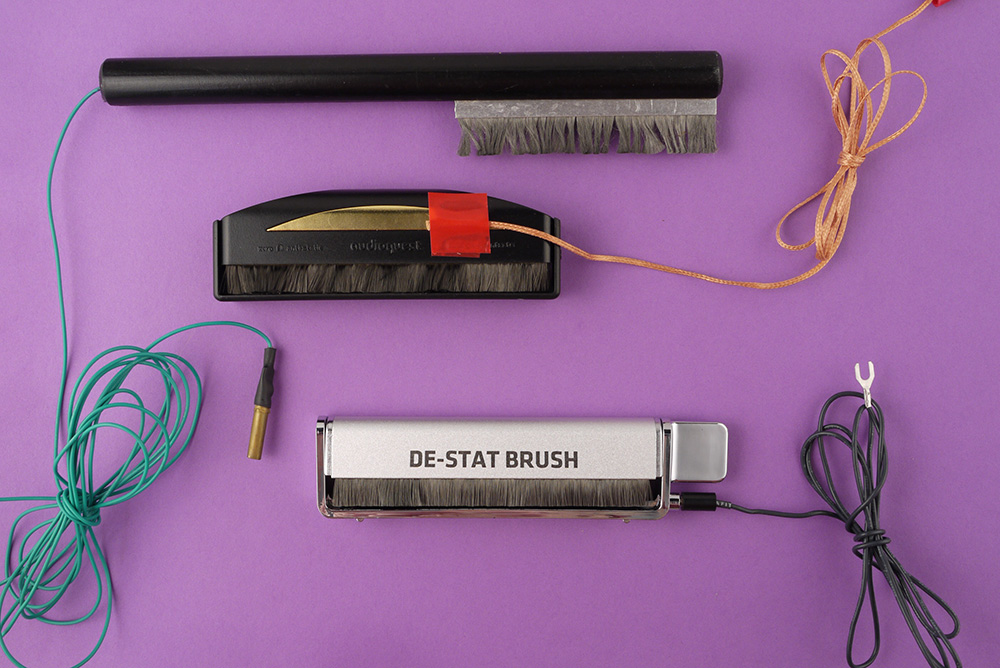
Been frustrated using a "conductive" carbon fiber record brush? The $30 Audioquest gold-plated metal finger contact record brush reinvents the original Decca design with specific touch point(s) to drain the charge, but even they won't work well if you wear rubber soled shoes—you are not grounded, son. Hence also that annoying pop when you touch the tonearm. The trick is to first touch finger and/or disc before and after play to something that is grounded. I've long used a small brass knob (coating removed with nail polish remover) on the rack wired to an outlet cover-plate screw (thus not blocking a receptacle). It is also helpful to ground the turntable itself. My vintage Nottingham Analog Spacedeck has a banana plug jack in the bearing housing to do just this, but you may have to improvise at the tonearm base or motor, etc. Note: all this is in addition and not connected to the standard ground wire from tonearm to preamp.
I decided to hack the AQ brush a couple days after I got one. I used a few feet of flat copper braid (sold for wicking solder), connected that to the brass knob, and thus to the 16 AWG wire from there to the outlet ground—but any light, flexible stranded wire would do. For all I know this hack would work on other carbon fiber brushes, and of course the drain wire could go direct to the outlet. See instructions in IKEA format visuals below.
The idea for grounding the AQ brush came from years of using a larger grounded anti-static brush from Mapleshade, but I'm also in the process of scanning 50 yrs worth of negatives and slides, and it is perfect for that project. In preparing this essay I checked online for the availability and price of it ($58.50)and the similar one from Acoustic Sounds ($52.99). Mirabile dictu, the Google also led me to TurntableNeedles.com and their De-Stat brush. The form factor of the brush may look familiar, but the substantial folding chromed handle features a detachable grounding wire! On sale for $19!
Finally, to actually eliminate static electricity, one needs to neutralize the charge with both positive and negative ions. The least expensive audiophile option—the Milty Zerostat gun—is well over my $50 limit. However, one can easily suppress static (and airborne dust) with inexpensive negative ion generators. I've used them for years in the darkroom as well as listening room (and the workspace where I clean LPs). The negative ions cause air-borne particulates to fall to the floor (so cover the turntable). Amazon has many options—but skip the ones that generate significant ozone. I recently added two IonPacific devices (on sale) to my arsenal—the nifty ($40) ionFan for my LP cleaning station, and the diminutive ionMi for the shelf behind the turntable (alas, now up to $55). Both run off USB rechargeable batteries, so are easy to Velcro where needed.
I'm sure many vinylphiles would agree to disagree with some or much of what I've included here. There are also many commercial analog tweaks and accessories available for over $50, and many are worth the added tariff—I've bought quite a few. I simply hope some of all this has been informative and helpful, even if just in a Crazy Uncle kind of way. And I still like my $50+ reissue LPs, regardless of provenance—but now it's time to get up and turn one of those very records over.

